Bal-tec™ Home Ring-Lapping
Ring-Lapping — Lapping Outside diameters — Lapping Cylinders — Cylindical Ring-Lappig

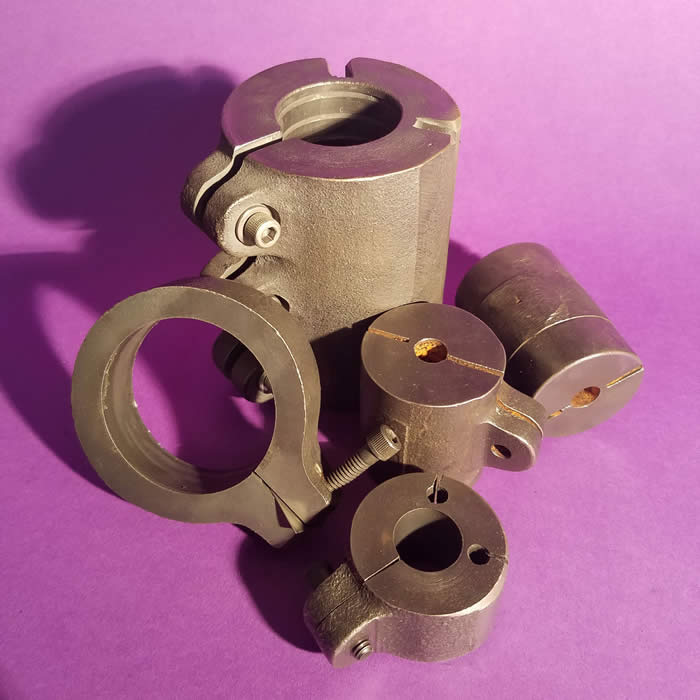
Part of our company’s policy for pleasing our customers and potential customers is to improve their ability to better compete in today’s precision and ultra-precision market. We are doing this by sharing our special technical knowledge with them and offering the means to develop and employ ultra-precision parts. We are now offering cast-iron Ring-Lapping tool blanks, based on our many years of in-house experience. These ring-lapping blanks can be easily machined by any ordinary machine shop so that they are ready for use.
First the inside cylindrical-diameter of the ring-lap is drilled and reamed, or single point bored, on an engine-lathe or milling-machine, to produce a reasonably round hole that is a snug fit on the part. If available, a light honing operation will further improve the lapping tool prior to lapping. Next, the side threaded-hole, or holes, used to adjust the tension on the lap are drilled and tapped in the wing of the lapping tool blank. This lap then has a slot cut through the center of the wing into the center through hole, creating the "C" shaped ring-lap.
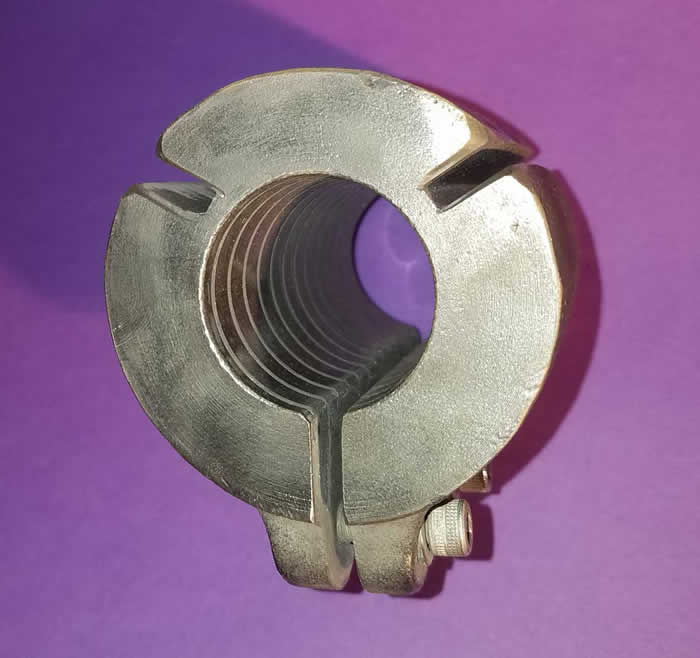
Next the lap is slotted part of the way through, ideally at about 120 degrees in two places for acceptable slotting patterns. For one piece or very small quantity production just a single slot will suffice. On many larger diameter tools you may be able to get by without any extra slots. The lap only has to be flexible enough to adjust the tension on the part. Narrow tools, used for lapping short surfaces, can be successfully produced by counterboring one or both ends of the ring-lapping Tool. Counterboring both ends of the lap is preferred, but you may be lapping up against a shoulder. Having the working surface of the lap out on the end makes it much easier to see what you are doing. This technique is used to keep a narrow lapping tool from twisting sideways when adjusted.

These cast iron lapping tool blanks will allow any machine shop to produce outside cylindrical-diameters that are accurate within micronches. Cylindrical ring-lapping will generate parts with an outside diameter which is almost perfectly round, straight, and to any exact size. You just keep lapping and adjusting the lap tighter until you reach the desired size, taking care to flip the lap regularly.
With a somewhat greater effort, parts may be precision lapped directly from a machined surface instead of the normal cylindrical-ground surface. This process usually requires a rough (500 grit) and then a finer (1000 grit) abrasive to be used with two different ring-lapping tools. A hardened cylindrical part that isn’t too lon, about 2 inches (50.8 mm) or so, can be ring-lapped straight, round, and to an exact size within about twenty microinches (.000020", or 0.5 µm) with relative ease. An R.A. surface finish of about two micro inches (50.8micrometers) will come relatively easy. Waviness will be practically nonexistent.
When you get deadly serious, the straightness, roundness, and size can be controlled within about two microinches (.000002", 0.0508 µm). Beyond this quality level, the elasticity of the part and the lapping tools become the problem. This is what we call the bubble gum region. At the low micro-inch level, everything acts like a wet noodle. This elasticity sets in at the very low micro-inch level and the only way to get beyond this point is to make the parts out of a much stiffer material, such as tungsten carbide, aluminum-oxide (corundum / ruby), or ceramic (silicon-carbide, etc). Parts with cross holes or under cuts can still be ring-lapped. The ring-lap must be wide enough to span these geometries while still maintaining a purchase on solid material.
The length of the ring-lapping tool is important for controlling the camber or bend of the part. A long lap (the same length as the part or even somewhat longer) will smother the part and tend to correct any bend or camber in the “axis of rotation of the part,” but over stroking the part with this long lap, can make the O.D. of the Cylinder smaller on both ends, tapering them, due to the tendency of the lap to limp off the endes where it is unsupported and adds weight to the end of the pard. To solve this problem you will need two ring-lapping tools. A long one, that is used first, to correct the camber and then a somewhat shorter ring-lap that is used later to correct the dubbing tendency of the long lap, by selectively lapping the center more.
The beauty of the ring-lapping process is that the lapping tool will lap down errors in the part, but at the same time the part will also lap down errors in the lapping tool! It is this averaging-of-errors phenomenon that makes the ring-lap work so exceedingly well. The lap should 'smother' the part so that the prominent points of the lap attack the prominent points of the part and vice versa. In this way both errors are rapidly reduced, one after the other, to routinely generate a nearly perfect geometry.
The ring-lapping tool must be kept snug and tightened during use. The fine pitch screw or screws on the wing can be loosened to take the lap off and to put it on. The operator should feel the torque of the part rotating as the lap is held and kept from turning with the part. There is some art involved here but not as much as you might think. Patience is a factor, since material is being removed a small amount at a time. The final quality of the lapped part is basically determined by the size of the abrasive particles used in the lapping process as well as the stiffness of the part and lapping tool.
This is the reason for making the Ring-Lap so robust.Obviously the finer the abrasive, the higher will be the quality of the part, but the slower will be the abrasion, so an acceptable balance must be reached to get any work done. If the quality of the original parts isn’t very good, there may need to be a roughing and a finish operation. By using two different abrasive grits and two separate lapping tools you will get excellent results as previously described for lapping unground parts. The part or the tool is usually rotated at the relatively low speed of 300 to 600 surface feet per minute. Resist the urge to lap at very high rotational speeds; stock removal rates is affected more by the pressure between the two surfaces than by the speed of their relative movement. Keep the lap tight. Very small diameter parts are usually rotated at a much slower speed than this, just from a practical stand point. It isn’t practical to ring-lap a small part turning a thousand or thousands of revolutions per minute. The surface speed of the lapping process is relatively unimportant compared to the pressure being applied by the lap. The ring-lapping tool is applied to the rotating part with a paste of abrasive powder and a vehicle of oil or grease smeared on the part. This application of abrasive is usually done with the operator’s fingers or a soft brush.

Generally speaking, lapping abrasive coarser than 500 grit isn’t practical and something around 1000 grit is most commonly used. Steel is usually lapped with aluminum oxide abrasive and tungsten carbide or ceramic will require diamond abrasive. The inside diameter of the ring-lapping tool is gradually reduced to apply more pressure by tightening the fine pitch screw or screws on the wing of the lap, providing a rotational torque that can be judged by the operator’s feel while holding the lap. The lap should grip the part a bit. If not, tighten the lap. By this means, the operator can feel material being removed as the lap goes from gripping to loose and need to be retightened.
As the part or the tool is rotated by a driving machine of some sort, the lap or the part is reciprocated slowly back and forth to cover the part being lapped, with a stroke that has some overlap. This is where some of the art comes in, you must move the ring-lap back and forth evenly. The ideal machine for doing cylindrical ring-lapping is a manual honing machine, but a metalworking lathe or a homemade slowly-rotating device, will work. Periodically the lapping tool, or the part, is reversed 180 degrees. This periodical reversal works the same way that the rotational high spots on the lap and the part correct each other. This reversing process basically corrects the inaccuracies of both the part and the lap. If one side of the lapping tool or the part begins to lap more than the other, the tendency will be for both the part and the lap to begin going tapered to one side. By flipping the lap over, this counters this trend instantly and causes the lap and the part to lap back to perfectly cylindrical.
If there are a number of parts on the order, you would do a little lapping on several parts to break in the ring-lapping tool or tools, before trying to finish any of the parts. Our ring-lapping tools are made from very fine grained gray lapping iron. This material will work in almost every lapping application. This rather soft, gray lapping iron tends to take on a change of abrasive, meaning the abrasive tends to embed into the metal. This embedded abrasive effectively armor plates the inside diameter of the lap so that one lapping tool will last for a great number of parts. Somewhere along the line, we need to define a “practical” cylinder.
To do this we need to establish a formal concept of cylindricity. The basis of this concept we will call the “axis of rotation.” Think of this axis as an infinitely fine diameter wire stretched taunt between the perfect centers of the cylinder ends. The cylindrical surface of the part is the geometry that is generated by a constant “line radius” that is rotated around this theoretical axis of perfect rotation. The factors that make a perfect cylinder are that the line radius remains constant (which is the roundness and consistant diameter of the cylinder) and that the axis of rotation be perfectly straight (any error in this condition is camber or dog leg) i.e.: bending.
Some of the common errors in cylindicity: are called 'out of round' which is simply any variations in the length of the radius to the line radius of the cylinder, in one trip around the axis of rotation. The apparent result of this would be a variation in diameter, but beware, odd numbers of lobes (“poly-lobularism,” which is three, five, seven or nine lobes) that are commonly generated by processes like centerless grinding, will not be detected at all, by any conventional two point gaging system (as to why this is, see the Reuleaux Triangle and the Objects of Constant Width which are quite obviously not round, but always measure the same diameter in any two-point measuring device). Ring-lapping will quickly correct any lobular condition of the parts (see our technical paper on measuring sphericity to give you a background on roundness). Any variation in the longitudinal radius along the cylindrical axis or axis of rotation, is called 'out of straightness.' It is larger and smaller diameters from end to end.
Camber or 'dog leg' is any bend in the axis of rotation. You could have a very cylindrical piece of wire, with an exactly constant radius, that is literally tied into a knot. For a very fine quality cylinder there is also the surface finish and waviness of the cylindrical surface itself to consider. The question that is involved here is, where does the geometry of the part end and surface finish and or waviness begin. The real answer to this question is how does it affect the function of the lapped part. This is the one and only answer to this controversial question, which has been debated for forever.
In extreme situations, the orientation of an unsupported cylinder in relation to the gravitational field becomes a factor. An unsupported cylinder will bend or sag due to the force of gravity acting on its mass. This facet of the error equation is very length dependant. Even for cylinders standing vertical there will be a “girth sag” due to the force of gravity to consider. Don’t poo-poo this factor, as in very precise situations the mass to size ratio and stiffness are commanding factors.
To reiterate some of the common linear or axial errors for cylinders are:
- 'Barrel shape,' which means that both ends of the cylinder are smaller in radius than the center; the ends have been rolled off or 'dubbed.'
- 'Taper' is when the radius at one end is gradually smaller than the radius of the other end. For pressing on bearings, the direction of any taper maybe a drawing specification.
Another more complex but still very common problem is 'snaking' which shows up in longer parts, i.e.: parts with a long length to diameter ratio (aspect ratio). The snake effect can have several variations. There can be several variations in the cylindrical diameter, along the axis, or there can be several variations in camber or bend and there is frequently some of both. Think of this factor in terms of up and down and larger and smaller. This situation can be strongly influenced by any hardness variations in the metal itself along the length of the shaft.
A long ring-lapping tool will correct this complex snaking error, totally, but this condition is very hard to measure without using a sophisticated profile recorder (linear) and a roundness measuring instruments such as the Talyrond system. The typical, result-oriented, practice that is used to cope with this measuring problem is to lap the part until the errors measured seem to have been corrected and then to lap the part some more.
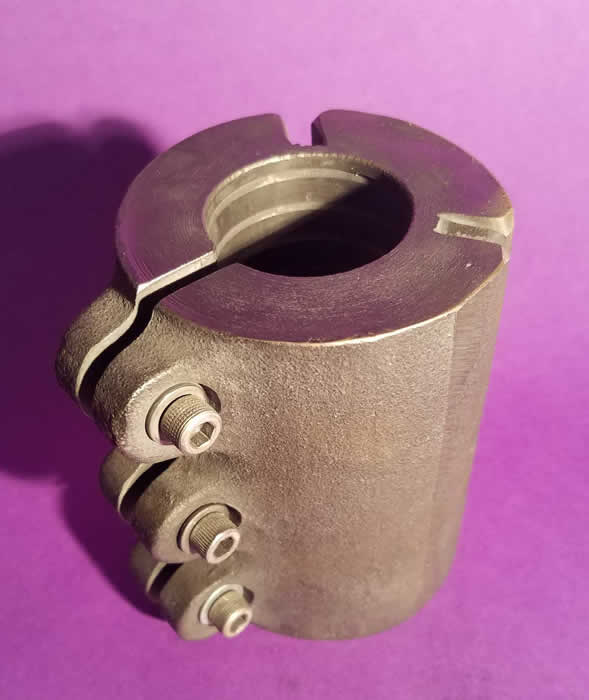
We offer three standard diameters of eight-inch long ring-lapping tool blanks in our premium gray cast iron. You simply saw off the desired length as a blank and finish machine.
- The smallest diameter ring-lapping tool, is one and three quarters of an inch in diameter and it is eight inches long. This is our part number RLT-175.
- The middle diameter ring-lapping tool, is two and one quarter inch in diameter and it is eight inches long. This is our part number RLT-225.
- The largest diameter ring-lap blank is three inches in diameter and it is eight inches long. This is our part number RLT-300.
There is a rectangular shaped boss that runs the length of the part, on the outside of each of the ring-lapping tools, to provide for the clamping screws. This boss is frequently referred to as the 'wing.' In addition, the wing provides a torque break, preventing the lap from being rotated in the hands of the operator by the rotational force of the lap when in use.
When ring-lapping large diameter, the rotational force of the lapp gripping the part can be significant. To counter this, a torque arm can be attached to the sides of the lap, or a “strap wrench” can be used to keep the lap from rotating while still allowing reciprocating motion on the part. For another approach to cylindrical lapping, see our paper on stick lapping.
| Description | Part # | Price |
|---|---|---|
| 1.75" Diameter x 8" Ring Lap Blank | RLT-175 | $27.00 |
| 2.25" Diameter x 8" Ring Lap Blank | RLT-225 | $36.00 |
| 3.00" Diameter x 8" Ring Lap Blank | RLT-300 | $49.00 |
