Bal-tec™ Home Software Errors in C.M.M. Evaluation
Software Errors in C.M.M. Evaluation

Wake up! Today we have a situation of runway complexity in Coordinate Measuring Machine calibration. Presently there is little or no transparency to the measuring machines calibration process. The philosophy is that C.M.M. users today don’t want to have to think, they just want quick and dirty answers. You are held as a helpless hostage, who must blindly follow instructions and mindlessly accept the wisdom of some computer guru who, without explanation, dictates good or bad. What would you think of software that intentionally ignored 20-30% of the non-conforming data collected? Oh well, most of those outliers were probably bad measurements anyway! Their term for these shenanigans is: “band pass algorithms.”
They come along and plug in a laser interferometer or some proprietary artifact that is interfaced with an on board computer that uses compiled programs which will hopefully make a not so accurate piece of hardware perform flawlessly. The real questions are “Will mating parts fit together as planned or will they not?” will the pins fit into the holes? Will the mating surfaces seal? The real irony here is that there are totally transparent, very accurate, yet inexpensive tools available that don’t require a single line of software, but will fully evaluate and or legally calibrate the full function of your Coordinate Measuring Machine, to ANSI-B89 or VIM-VAR standards.

There are 21 parametric error sources that affect the accuracy of a Coordinate Measuring Machine. However, this number is based the concept that the frame of the measuring machine is a rigid body, which it is not. With all of the potential elastic or bending moments, there can be any number of other errors, but fortunately they are all variations on the original theoretical error sources.
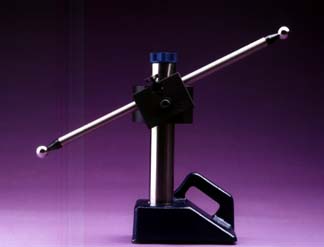
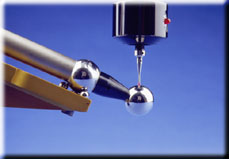
The very simple but elegant tool that will deliver all of the above promises is the Ball Bar or Dumbbell. The Ball Bar (Dumbbell) is a study in simplicity. In consists of two very spherical balls of exactly the same diameter that are securely attached to a rather long rigid bar. The distance between the two balls is absolutely fixed so the accuracy of the Ball Bar (dumbbell) is only limited by the sphericity and common diameter of the two balls. By measuring the distance between the two spheres in a variety of positions and at a number of angular locations, all of the 21 error source can be quickly evaluated and corrections to the machine can be made to eliminate them.
My favorite calibration gimmick lately is a triangular pyramidal shaped hodge-podge of balls that will give a mystical volumetric evaluation of the C.M.M. It is all done with software, so all you have to do is measure the inter ball dimensions and your machine is calibrated. One look at this device and you would have to conclude that the upper elevations of the machine’s volume must not be of any importance, because that part of the machine’s volume isn’t even explored volumetrically. To evaluate the upper reaches of the machine, the pyramid would have to be stood up on its apex, which can’t be done. Even if we are willing to blindly accept this software driven device’s ability to evaluate the machine’s inaccuracies, what can you do about it? You can’t do a single thing to correct them anyway. If you compare the price of this device, with a complete Ball Bar (Dumbbell) and stand, it will give you hiccups. The Ball Bar (dumbbell) will not only give you a true volumetric evaluation of your entire machine, but it will separate and identify each and every individual error within your measuring machine’s envelope. Armed with this information, corrections can be made that will maximize the accurate performance of your coordinate measuring machine.
