Bal-tec™ Home All Kinematic Cylinders
All Kinematic Cylinders
Complete Cylinder
Made from Hardened StainlessSteel
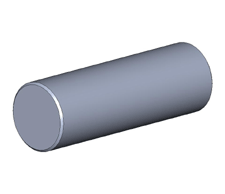
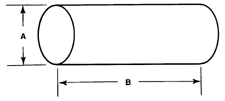
The complete cylinder is a low cost, high quality component widely used in kinematic applications. Two parallel mounted cylinders form a very high quality substitute for the hard-to-manufacture vee groove. These hardened and dimensionally stabilized stainless steel cylinders are precision ground and machine lapped to provide excellent cylindricity with close dimensional tolerance.
| Downloads | ||
|---|---|---|
| Solidworks | IGES | |
| N/A | ||
The highly uniform low microinch surface texture generated by the machine lapping leads to low hysteresis and excellent repeatability. These complete cylinders can be press fit, shrink fit or glued into mating holes. They can also be clamped in place by a number of different methods. The surface finish is 1 microinch Ra maximum (.0000254 mm). The cylindricity of all cylinders is .000020" (.000508 mm).
| Pricing | ||
|---|---|---|
| Part # | Price | Purchase |
| 187-C | $7.50 | |
| 250-C | $7.50 | |
| 312-C | $7.50 | |
| 375-C | $7.50 | |
| 500-C | $8.36 | |
| 625-C | $9.64 | |
| 750-B | $10.95 | |
| 100-B | $13.81 | |
Truncated Cylinder
Made from Hardened Stainless Steel
| Downloads | ||
|---|---|---|
| Solidworks | IGES | |
| N/A | ||
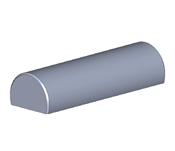
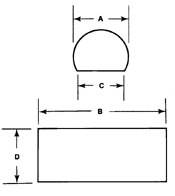
The truncated cylinder is the least expensive modified cylinder. It is used in close quarters where reduced profile height and or increased stability due to the flat base are important. These hardened and dimensionally stabilized stainless steel cylinders areprecision ground and machine lapped to provide excellent cylindricity with close dimensional tolerance. The highly uniform low microinch surface texture generated by the machine lapping leads to low hysteresis and excellent repeatability. Two parallel mounted cylinders form a very high quality substitute for the hard-to-manufacture vee groove. The truncated cylinders are usually clamped or glued into position.
| Pricing | ||
|---|---|---|
| Part # | Price | Purchase |
| 187-TC | $14.58 | |
| 250-TC | $14.58 | |
| 312-TC | $15.07 | |
| 375-TC | $15.90 | |
| 500-TC | $17.55 | |
| 625-TC | $22.36 | |
| 750-TC | $27.17 | |
| 100-TC | $32.56 | |
Truncated and Recessed Cylinder
Made from Hardened Stainless Steel with an Extended Glue Line

| Downloads | ||
|---|---|---|
| Solidworks | IGES | |
| N/A | ||
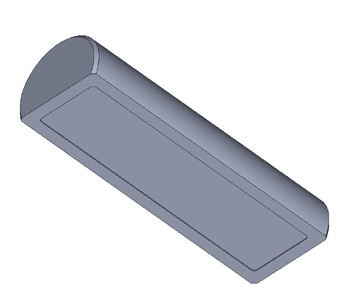
The truncated and recessed cylinder is used where reduced profile height and or increased mechanical stability provided by the flat rim are required. This design has a .005" deep recess on its flat surface that is made very rough by Electrical Discharge Machining. This rough surface is used in applications where the cylinder is glued in place. These hardened and dimensionally stabilized stainless steel cylinders are precision ground and machine lapped to provide excellent cylindricity with close dimensional tolerance. The highly uniform low microinch surface texture generated by the machine lapping leads to low hysteresis and excellent repeatability. Two parallel mounted cylinders form a very high quality substitute for the hard-to-manufacture vee groove. The truncated and recessed cylinder is usually clamped, glued, or clamped and glued into position.
| Pricing | ||
|---|---|---|
| Part # | Price | Purchase |
| 187-TCR | $16.78 | |
| 250-TCR | $16.78 | |
| 312-TCR | $17.27 | |
| 375-TCR | $18.10 | |
| 500-TCR | $19.36 | |
| 625-TCR | $25.19 | |
| 750-TCR | $31.57 | |
| 100-TCR | $35.86 | |
Threaded Cylinder
Made from Hardened Stainless Steel with Tapped Holes
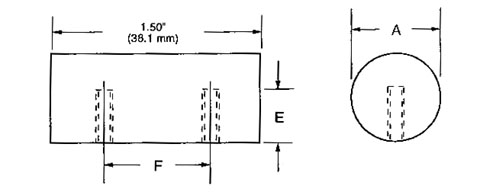
Because the cylinder is held from behind with machine screws, there is no interruption of the cylindrical surface. This provides a smooth, clean working surface. These hardened and dimensionally stable stainless steel cylinders are precision ground and machine lapped to provide excellent cylindricity with close dimensional tolerance. The highly regular, low micro inch surface texture generated by the machine lapping leads to low hysteresis and excellent repeatability. Two parallel mounted cylinders, held in place by machine screws form a very high quality substitute for the hard-to-manufacture vee groove.
| Part # | A-Diameter ±.0001" | Screw Size | E-Depth Reference | F-Center Line |
|---|---|---|---|---|
| 250-C-T | .250" (6.35mm) | 6-32 | .125" (3.175mm) | 1.00" (25.4mm) |
| 312-C-T | .3125" (7.9375mm) | 6-32 | .154" (3.91 mm) | 1.00" (25.4mm) |
| 375-C-T | .3750" (9.525mm) | 10-32 | .200" (5.08 mm) | 1.00" (25.4 mm) |
| 500-C-T | .500" (12.70 mm) | 1/4"-20 | .250" (6.35 mm) | 1.00" (25.4 mm) |
| 750-C-T | .750" (19.05 mm) | 1/4"-20 | .250" (6.35 mm) | 1.00" (25.4 mm) |
| 100-C-T | 1.00" (25.40 mm) | 1/4"-20 | .250" (6.35 mm) | 1.00" (25.4 mm) |
| Pricing | ||
|---|---|---|
| Part # | Price | Purchase |
| 250-C-T | $33.77 | |
| 312-C-T | $33.77 | |
| 375-C-T | $34.60 | |
| 500-C-T | $36.96 | |
| 625-C-T | $37.88 | |
| 750-C-T | $38.78 | |
| 100-C-T | $41.36 | |
Truncated and Threaded Cylinder
Made from Hardened Stainless Steel with extended glue line and tapped holes.
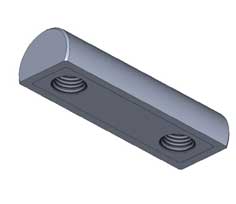
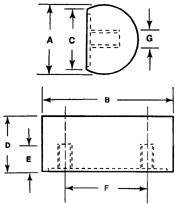
Because this cylinder is held from behind withmachine screws, there is no interruption of thecylindrical surface. This provides a smooth, cleanworking surface. The truncated and threaded cylinder isour most widely used cylindricalcomponent.
| Downloads | ||
|---|---|---|
| Solidworks | IGES | |
| N/A | ||
The land left around the edge of the flat due to the recess forms an extremely stablemounting surface. These hardened and dimensionally stabilized stainless steel cylinders are precision ground and machine lapped to provide excellent cylindricity with close dimensional tolerance. The highly-regular low microinch surface texture generated by the machine lapping leads to low hysteresis and excellent repeatability.
Two parallel mounted cylinders, heldin place by machine screws, form a very high qualitysubstitute for the hard to manufacture veegroove. This design has a .005" deep recesson its flat surface that is made very rough byElectrical Discharge Machining. When maximum reliability is required, glue may be applied to this rough surface to form a permanent bond between this component, the machine screw, and the mounting surface
| Pricing | ||
|---|---|---|
| Part # | Price | Purchase |
| 250-TCR-T | $40.37 | |
| 312-TCR-T | $40.37 | |
| 375-TCR-T | $41.20 | |
| 500-TCR-T | $43.12 | |
| 625-TCR-T | $44.25 | |
| 750-TCR-T | $45.38 | |
| 100-TCR-T | $47.96 | |
Truncated Cylinder with Counterbored Holes
Made from Hardened Stainless Steelwith an Extended Glue Line
| Downloads | ||
|---|---|---|
| Solidworks | IGES | |
| N/A | ||
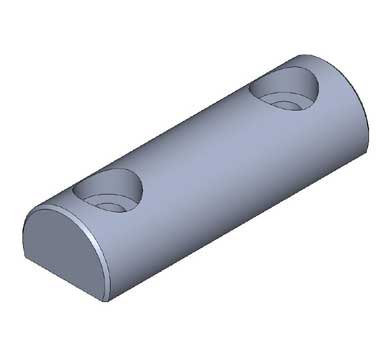
The truncated cylinder withcounterbored holes is our second most popularcylindrical component. It is used when thecomponents must be held in place from the frontside.
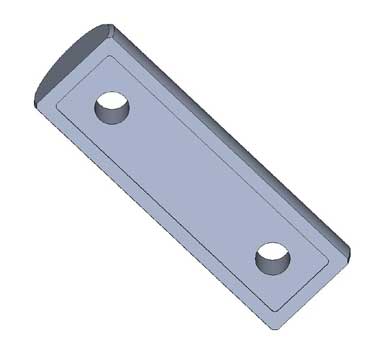
These hardened and dimensionally stabilized stainless steel cylinders are precision ground and machine lapped to provide excellent cylindricity with close dimensional tolerance. The highly uniform low microinch surface texture generated by the machine lapping leads to low hysteresis and excellent repeatability. The land left around the edge of the flat due to the recess forms and extremely stablemounting surface. Two parallel mounted cylinders form a very high quality substitute for the hard-to-manufacture vee groove. This design has a 0.005" deep recess on its flat surface that is made very rough by Electrical Discharge Machining.
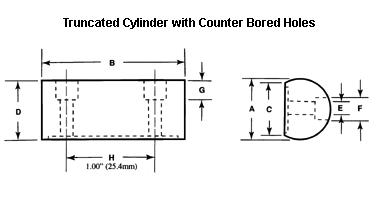
When maximum reliability is required, glue may be applied to this rough surface to form a Permanent bond between this component, the machine screw, and the mounting surface. This component is machined for use with a standard socket head cap screw.
| Pricing | ||
|---|---|---|
| Part # | Price | Purchase |
| 250-TCR-CB | $41.69 | |
| 312-TCR-CB | $41.69 | |
| 375-TCR-CB | $42.35 | |
| 500-TCR-CB | $52.69 | |
| 625-TCR-CB | $53.24 | |
| 750-TCR-CB | $53.79 | |
| 100-TCR-CB | $69.96 | |
The Kinematic Quarter Round
| Downloads | ||
|---|---|---|
| Solidworks | IGES | |
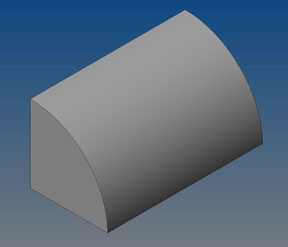
The Quarter Round is a different approach in kinematic design. A different reality is unlocked by simply thinking in different terms. How do you describe the surface of a Kinematic Platform?
Is it the top of the physical plate orcould it be better defined as the central plane of thekinematic system? What this changes is the very nature ofthe kinematic system. In order to achieve veryhigh levels of mechanical perfectioni.e. geometry and surface texture in the kinematicelements, they are produced as separateentities that are then attached to the platform.In order to get enhanced physical properties, i.e.hardness, stiffness and corrosive resistance in kinematicelements that are better than the material of theplatform itself, the same approach is used. By simply burying these enhanced kinematicelements in self supporting trenches that are machined intoplatform proper, the rigidity and the resonatefrequency of the platform can be raised by orders ofmagnitude.
The Quarter Round
A high quality Vee Block is one of the mostdifficult pieces of kinematic hardware to produce. For thisreason, two parallel cylinders have become apopular Ultimate Round for the flat angled facets of a Vee Block. Although very high qualitycylinders are easy to produce, it is difficult to rigidlyattach them to the Kinematic Platform. Cylinders of largediameter have a high profile, are heavy, and quiteexpensive
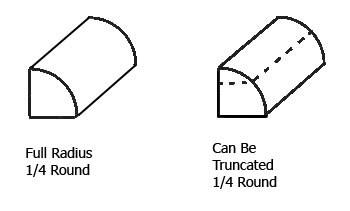
By splitting a precision lappedcylinder of rather large diameter into quarters, weproduce components that can be rigidly glued into a simple slotor trench machined into the Kinematic Platform.
The Ultimate Quarter Round
The "Ultimate Quarter Round" is the zenith ofperfection in kinematic components. When used in combinationwith grade 2.5 quality tungsten carbide spheres, thesecomponents will challenge present capability of errorevaluation. When used in a well-designed kinematic system, the errorbudget will be measured in nanometers and microradians.
How is this extraordinary performance achieved? We start with the choice of materials. The stiffness of tungsten carbide, measured in compression, ison the order of one hundred and twelve million pounds persquare inch. This is only surpassed by diamond in readilyavailable materials.The hardness of tungsten carbide is 91 HRAor 1500 Vickers. Abrasion tests rate it at 20 to 30 timeshard steel.
Now we compound these qualities by producing the materialwith a particulate grain diameter that is less than onemicron. As if this isn't enough, the material hot isostatic pressedto achieve 100% density, virtually eliminatingany porosity. The original cylinders that are used to produce the"Ultimate Quarter Round" are first centerless ground using adiamond wheel. They are then ring lapped to correct anyPolylobular condition. Next they are machine lapped with threeprogressively finer diamond compounds, toachieve a surface quality that is below 0.1 microinches Ra, 2.5nanometers.
The normal mounting technique is to glue the component quarter rounds into a machined trench with a highstrength ceramic filled epoxy. If the epoxy glue is objectionable, for vacuum or otherreasons, a threaded hole can be provided atthe apex of the triangular back mounting surfaces. Thismounting method has been well proven in high-endoptical applications. Unique Quarter Round components will be custommanufactured to meet any customer requirement. These mayinclude corrosion resistance and special magnetic or electricalproperties.
| Part Number | Material | Original Cylindrical Diameter | Length |
|---|---|---|---|
| QR-75-S | Quarter Round Steel | .750" (19.05 mm) | 1.00" ( 25.4 mm) |
| QR-75-TC | Ultimate Round Tungsten Carbide | .750" (19.05 mm) | 1.00" (25.4 mm) |
| QR-100-S | Quarter Round Steel | 1.00" (25.4 mm) | 1.00" (25.4 mm) |
| QR-100-TC | Ultimate Round Tungsten Carbide | 1.00" (25.4 mm) | 1.00" (25.4 mm) |
